• Hey All! Lately there has been more and more scammers on the forum board. They register and replies to members requests for guns and/or parts or other things. The reply contains a gmail or hotmail address or similar ”anonymous” email addresses which they want you to reply to. DO NOT ANSWER ANY STRANGE MESSAGES! They often state something like this: ”Hello! Saw your post about purchasing a stock for a Safari. KnuckleheadBob has one. Email him at: [email protected]” If you receive any strange messages: Check the status of whoever message you. If they have no posts and signed up the same day or very recently, stay away. Same goes for other members they might refer to. Check them too and if they are long standing members, PM them and ask if the message is legit. Most likely it’s not. Then use the report function in each message or post so I can kick them out! Beware of anything that might seem fishy! And again, for all of you who registered your personal name as username, please contact me so I can change it to a more anonymous username. You’d be surprised of how much one can find out about a person from just a username on a forum such ad our! All the best! And be safe! Jim

Sako L61R bolt guide differences

Sako Collectors Club Discussion Forum

konaboy

Member
Hey folks,

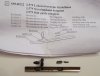
I recently had my beater Sako rebarreled and the gunsmith noted some issues "One is the missing ‘block’ that fits under the guide and causes it to index properly. The other is you need one new bolt guide retaining collar." I had the previous barrel rechambered and can only assume the other "smith" had damaged the parts and I didn't notice with all the other issues with the rifle. I contacted Stoeger Canada and got a bolt guide replacement kit.

2YKc7U3.jpg


As you can see, the bolt guides aren't the same. I'm assuming that the new guide (on the left) is for the two lug bolt? From my figuring, I can just put the old guide back on with the new replacement parts...but I thought I'd ask here before I started fiddling around.

Thanks,

Cory
 
From my figuring, I can just put the old guide back on with the new replacement parts
That should work. However, while you've got the guide off would be a good time to polish the bolt and bolt guide on a wire wheel or something similar to improve the cosmetics of the bolt.
 
Be careful.......as the cupped clip must be re-assembled correctly, or the guide-bar may shift forward under recoil......locking the bolt.

Hope this helps.
 
Be careful.......as the cupped clip must be re-assembled correctly, or the guide-bar may shift forward under recoil......locking the bolt.

Hope this helps.

Hi,

From what I see, the cupped clips slide over the grooves in the bolt and then into the bolt guide? Is that the correct way or am I missing something?

OdKHuih.jpg


Do I have the stop plates oriented correctly or should they be the other way? Does the bolt stop spring go under the bolt stop? I don't have another bolt to look at.

Thank you,

Cory
 
On that old bolt guide you have there is a slot for only one clip (or bolt guide stop plate as it is called on the parts diagram). So that one on the left on your picture is extra, also it would be pointing the wrong way. You can see on the replacement bolt guide they machined the rear slot to take a clip too. They added the rear one to lessen the chance of the guide walking forward under recoil, as described by Kevin above.

If it was my rifle I would cut that new guide to length and use it.

I don't trust my english enough to give any instructions on the assembly. It's tricky. Good chance to stab your own hand with a screw driver, so be careful.

I added a photo of how those parts line up when assembled. Not exactly L61R parts but I hope you get the idea. Naturally the bolt body should be inside that ring when assembled. :D
 

Attachments

  • copy.jpg
    copy.jpg
    164.8 KB · Views: 73
As Po4R mentioned, only one "curved-tab" is needed.

The critical thing, during re-assembly, is for the square end of the tab to CURVE TOWARDS THE BOLT...........very critical!!!!

Otherwise......the guide collar ends can slip over the tab, and NOT lock the collar/guide-bar in place.
 
Last edited:
Hey folks,

Sorry for the quite delayed response, but sometimes life gets in the way of hobbies.

As Po4R mentioned, only one "curved-tab" is needed.

The critical thing, during re-assembly, is for the square end of the tab to CURVE TOWARDS THE BOLT...........very critical!!!!

Otherwise......the guide collar ends can slip over the tab, and NOT lock the collar/guide-bar in place.

Thank you, that confirms my reading of the schematic.

On that old bolt guide you have there is a slot for only one clip (or bolt guide stop plate as it is called on the parts diagram). So that one on the left on your picture is extra, also it would be pointing the wrong way. You can see on the replacement bolt guide they machined the rear slot to take a clip too. They added the rear one to lessen the chance of the guide walking forward under recoil, as described by Kevin above.

If it was my rifle I would cut that new guide to length and use it.

I don't trust my english enough to give any instructions on the assembly. It's tricky. Good chance to stab your own hand with a screw driver, so be careful.

I added a photo of how those parts line up when assembled. Not exactly L61R parts but I hope you get the idea. Naturally the bolt body should be inside that ring when assembled. :D

Thank you for the picture, that helps.

I found the schematic on the Sako website (https://www.sako.fi/sites/default/files/Finnbear.pdf), but I'm still a little foggy on the assembly of the "Bolt Guide Stop Plate Spring" and the "Bolt Guide Stop Spring"

I think I have the Bolt Guide Stop Spring oriented properly in this picture? Groove side down to hold the spring correct?

M9JoKbU.jpg


My big question is whether the spring should spring "up"?

BuKm7B6.jpg


Or spring "down"?

80kT2xg.jpg


Thank you kindly,

Cory
 
Cory goes like last picture posted here is a picture that may help
 

Attachments

  • P1210050.JPG
    P1210050.JPG
    158.3 KB · Views: 68
Is there a secret to getting the two mounting rings on? Needle nose pliers have been unsuccessful so far

Cory
 
You put one tab of the ring in the wide portion of the groove. While holding the whole thing together with one hand you jam the other tab in with a thin screwdriver. After the tabs are in the wide groove keep pressure on the guide strip with your hand and hammer the guide strip backwards forcing the tabs in to the narrow groove where they will be held by the guide strip stop spring.
 

Attachments

  • Dont stab yourself.jpg
    Dont stab yourself.jpg
    603.8 KB · Views: 48

Latest posts

Back
Top